Why Two Inspection Gates Decide a Used Fire Rescue Truck Purchase
A used fire rescue truck can pass a walkaround and still be a bad purchase. Two checks catch the problems that a clean-looking truck can hide. The first is the body mount system: whether corrosion has damaged the chassis-to-body connection. The second is pump test records that show what the pump delivered at rated flow and pressure. Paint, chrome, and low engine hours tell you very little about either one.
Both problems cost money after delivery, and neither shows up on a sales sheet. Body mount corrosion works behind brackets and frame rails, where it can eat into mounting hardware, welds, and the subframe before anyone notices. A pump without flow test history can hold pressure in the station bay and still fall short at a fire. A ten-minute demo drive will not reveal either defect.
For fire chiefs, fleet managers, and municipal purchasing officers, the practical rule is simple: inspect every body mount, fastener, and frame contact point, and treat missing or vague pump documentation as a reason to walk, not a bargaining chip. The same two checks apply to any fire fighting truck configuration, whatever the price, age, or mileage.
Body Mount Corrosion Mechanics on Used Fire Apparatus
The chassis-to-body joint is mechanically constrained, not sealed. Body mount brackets are usually welded or bolted to the frame rail and tied to the body sill, often aluminum, through elastomeric isolators and steel shim packs that set body-to-frame clearance. Those interfaces leave narrow gaps, and every bolt hole breaks the protective coating on both members. Once the coating is breached, the joint holds moisture against bare metal for hours after the truck returns to quarters.
Galvanic corrosion does most of the damage. Where the body is aluminum, steel brackets, bolts, and shims sit against aluminum extrusions. With water and de-icing salt present, the aluminum becomes the anode and gives up metal to the steel cathode. The attack concentrates at the contact faces, under washer heads, and along the shim stack, where oxygen differentials and chloride concentration produce pitting rather than even wall loss. Road brine sprayed onto the frame rail in winter is about as aggressive an electrolyte as these joints will see.
Closed box sections in the body subframe make it worse. Water and salt get into a boxed channel, road debris plugs the drains, and the section starts acting like a reservoir. Foam concentrate residue adds to the problem: many concentrates are hygroscopic, and some are alkaline, so they pull moisture into the joint and hold it there. Wash-down adds another cycle. High-pressure water pushes past isolator lips and into shim interfaces, then the truck sits wet. Do that dozens of times a year and the corrosion cell keeps restarting.
Surface oxidation and section loss are different findings. White aluminum oxide bloom or red iron oxide staining is mostly cosmetic while the parent metal is intact. Section loss is dimensional. Bracket flanges get thinner, shim stacks corrode into layers, bolt holes elongate, isolators take a compression set, and weld toes at the bracket-to-frame connection begin to crack. Once the section is thin enough, the mount cannot carry the loads the body puts on it during braking, pump operation, or a rollover.
The worst locations are hidden behind subframe members, fuel tanks, pump modules, rear steps, and compartment liners, where mirrors and cameras rarely reach and where salt and debris collect. An inspection that skips bracket thickness gauging, isolator compression checks, and torque verification is incomplete, no matter how clean the running board looks. Treat measurements as the acceptance criterion, and confirm before signing that worn isolators and shims can be replaced with the correct fire truck parts.
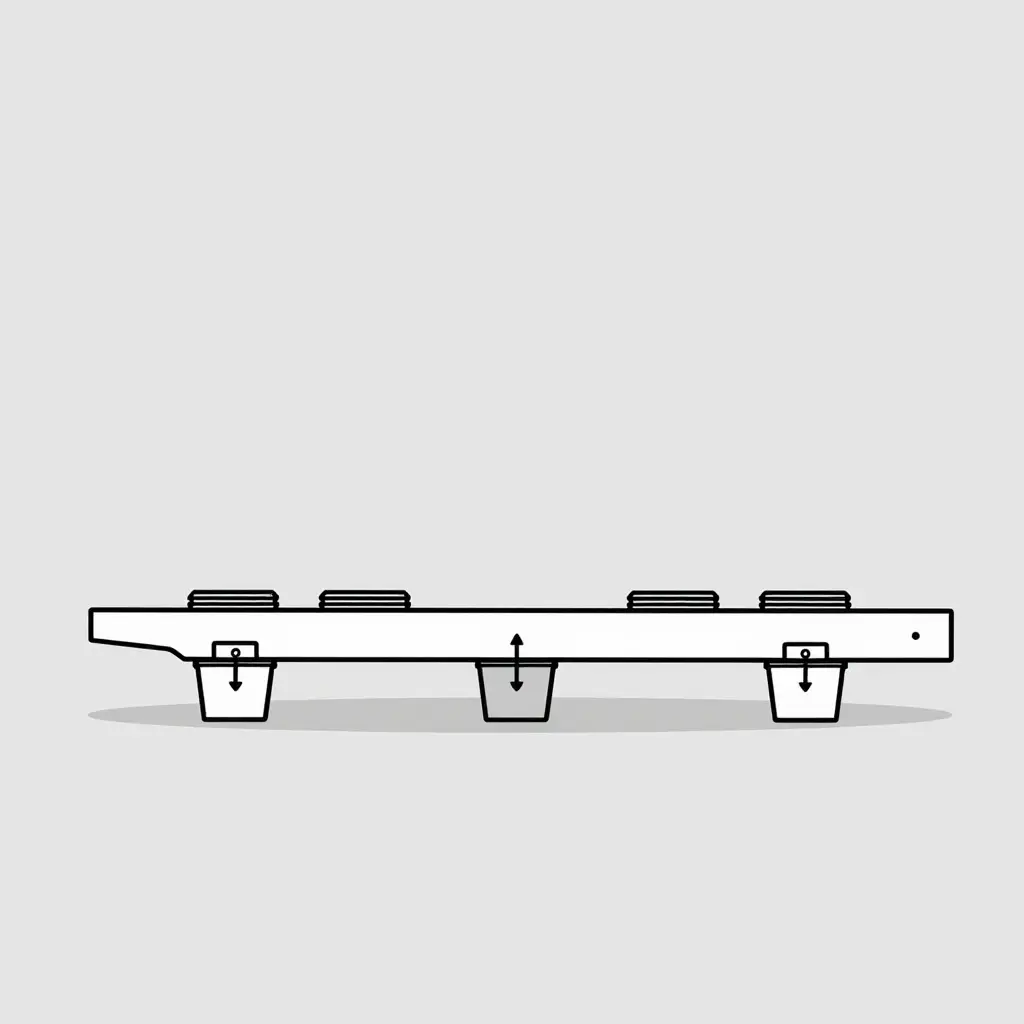
Corrosion-zone reference diagram. A side-profile schematic: the chassis rail below, the body subframe above, and three mount brackets between them. The square isolator pads and thin shim stacks are drawn as plain shapes. Arrows mark the three crevices that hold moisture and road salt longest: the shim-stack interfaces, the pocket between pad and bracket, and the channel where the bracket meets the rail flange.
Use the diagram as a map when the truck is on a lift. Those arrowed zones are places to probe, not glance at. If the diagram matches what you find, replacement hardware for the mounting system is available in our fire truck parts range.
The Ordered Inspection Sequence for Body Mount Corrosion
Body mount corrosion hides above, behind, and underneath parts that rarely come off between service intervals. Work through the following sequence in the same order every time, and write down each observation as you make it. Reconstructing notes from memory later is how inspection reports lose credibility.
- Read the file first. Pull the build sheet, isolator part numbers, prior repair orders, and any earlier inspection or pump test records before touching the truck. Repeated fastener re-torques or a previous structural assessment tell you where to spend measurement time.
- Put the truck on level, drained concrete. Use a pad with good light and overhead clearance. Level ground keeps the frame free of twist, so gap readings at the mounts reflect the static condition instead of a twisted chassis.
- Lift and support the chassis. Use a certified lift or rated ramps, then cribbing or stands under the frame rails. Do not work under a body held up only by hydraulics or suspension.
- Expose every mount. Remove access panels, fender liners, mud flaps, battery box covers, and splash shields. Corrosion hides under debris, undercoating, and the isolator washer.
- Inspect each isolator, bracket, hanger, and frame flange. Look for rust jacking, pack-out between mount and rail, cracked welds, elongated holes, and perished rubber. Probe suspect areas by hand and with a pick. Pay particular attention to the rear mounts on a heavy-duty fire truck chassis that has seen winter road salt.
- Measure what is left. Take ultrasonic thickness readings, or caliper readings on accessible flanges, at every mount and on the adjacent frame web. Compare each reading with the original nominal thickness and log the location, instrument, and value.
- Check torque on every body mount fastener. Clean the threads, look for stretch, wastage, and missing hardened washers, then verify torque with a calibrated wrench against the manufacturer’s specification for that fastener grade.
- Photograph and file the evidence. Put a scale reference and location tag in each photo, then attach the images to the measurement log in the procurement record. Photos settle later disputes about condition faster than memory.
When the walkaround is done, the report should rest on numbers. Thickness readings, torque values, and dated photographs are what a purchasing authority can defend in a committee meeting, a budget hearing, or a price negotiation. Interpretation belongs in a summary paragraph under the data, not in place of it.
Body Mount Corrosion Severity Grading
Body mounts carry load between the apparatus body and the frame, so corrosion there is a structural and liability question, not a cosmetic one. Grade each mount separately. A used pumper can have clean brackets at the rear and a perforated pump-module mount. Record the location, photograph it with a scale reference, log ultrasonic thickness (UT) readings, and assign a grade. The five grades below are a working scale for this inspection, not an NFPA classification. Used consistently, they give you a stable basis for price negotiation.
| Corrosion Grade | Observable Indicators | Structural Risk | Required Action Before Purchase |
|---|---|---|---|
| G1 – Light surface oxidation | Uniform oxide film or flash rust on bracket faces; no pitting; UT reading within 5% of nominal thickness; coating intact beneath scale; no rust staining at the isolator pad | Negligible; cosmetic and reversible | Clean, neutralize, and re-coat; note as a maintenance item; no price adjustment warranted |
| G2 – Isolated section loss | Pitting under 1.5 mm deep; local wall loss up to 10% of original thickness; scale on less than 25% of the mount face; staining trails from the isolator but no jacking | Low but progressive; accelerates with road-salt and decon-wash exposure | Take three UT readings per bracket plus one at the weld toe; apply rust converter and monitor at 12 months; hold back 2-5% of price against future remediation |
| G3 – Continuous section loss | Wall loss of 10-25% across a continuous band wider than 50 mm; flaking scale over the full bracket width; visible thinning at the weld toe; corroded isolator bolt heads or shanks | Moderate; load margin is reduced, and fatigue cracking becomes more likely | Demand a UT mapping report and dye-penetrant inspection of weld toes; deduct 8-15% of asking price or require a certified repair quotation before signing |
| G4 – Perforation at the mount bracket | Through-wall holes at the bracket or frame flange; greater than 25% thickness loss; daylight visible through the web; bolt torque cannot be held; rust jacking separating bracket from frame rail | High; the mount can no longer reliably transfer shear and withdrawal loads from body and pump module | Reject for front-line service; only an engineered repair with professional-engineer sign-off and post-repair load verification is defensible; price as parts or salvage value |
| G5 – Deformation or cracked welds at the mounting zone | Bracket distortion or bending; cracks in the weld or heat-affected zone confirmed by dye penetrant; elongated or ovalized bolt holes; frame rail web buckling or waviness | Critical; failure risk under braking, rollover, or pump-in-service vibration | Do not purchase. A field repair would not restore the engineered load path to a standard you can document; walk away regardless of price or pump test results |
How to Apply the Grades on Site
- Measure, do not guess. Use a calibrated UT gauge at three points per bracket and compare against nominal frame or bracket thickness from the build sheet; use a caliper on any exposed flange edge.
- Inspect under load. Chock the wheels, then watch the mounts while the pump runs at rated pressure. Movement or rust dust falling from a joint is a red flag even when the visual grade looks acceptable.
- Sound the joints. A dull thud on tap testing can mean delamination or internal scale; a sharp ring suggests sound metal.
- Grade the worst point, not the average. One G4 mount makes the vehicle a G4 vehicle for pricing purposes.
Using the Table in Negotiation
G1 and G2 are common on a fifteen-year-old apparatus, especially in road-salt service. G1 rarely justifies a discount; G2 usually supports a small holdback. G3 is where you have real room to negotiate. Pair the UT map with a written repair quotation and negotiate against the quotation, not the asking price. G4 and G5 are stop conditions. If the seller’s inspector disagrees, ask for a joint re-inspection with independent UT and penetrant testing, and check the finding against your department’s in-service inspection procedure, which should follow NFPA 1911. If you accept a G3 repair, include replacement mount hardware and bracket components in the scope; corroded isolators seldom survive disassembly.
Whichever grade you land on, file the grading sheet with the pump test records. A truck with strong pump numbers and a G4 mount is a parts purchase, not a fire engine. If condition is disputed later, that file is the record you will rely on.
Verifying Pump Test Records Before You Commit
During a used fire apparatus inspection, pump test records are the best documentary evidence that the pump still performs as rated. Paint and chrome can be refreshed in a weekend. Pump condition cannot be judged from appearance.
Ask for the full service history, not one certificate. A single recent test sheet says little about long-term wear. Request the annual test series for the truck’s whole service life. A rig that has served twelve years should have roughly twelve annual tests. If the file starts five years ago, the missing years are undocumented risk.
Every valid record should contain specific data. Reject any document missing the following:
- Test date and the interval since the previous test
- Pump model and serial number
- Rated capacity at rated pressure
- Measured capacity actually achieved
- Intake and discharge conditions during the test
- Engine speed at each test point
- Signature of the testing authority
Cross-check the pump serial number against the truck’s data plate. If the numbers do not match, either the pump was replaced without documentation or the paperwork belongs to another rig. Either way, stop until the seller explains it in writing.
Three findings should stop a deal. Gaps between annual tests leave the pump’s condition unknown for that period. Capacity shortfalls often indicate wear in the impeller, wear rings, or packing, and that wear tends to worsen. Re-tests with no documented corrective work can suggest a shop chasing a passing number; ask for the repair invoices before you accept a re-test.
Foam systems need their own proportioning verification. A water test says nothing about the concentrate pump, proportioner, or eductor. Ask for proportioning records with measured percentages at each flow setting.
If the records point to worn components, budget for replacement pump components and fire truck parts before signing. Paying for pump verification at purchase is cheaper than discovering the problem at a fire.
Rated vs. Measured Pump Capacity by Test Year
Before you accept a pump test record, plot the numbers. A 1,500 GPM pump can lose capacity gradually; the yearly trend reveals the loss before it becomes obvious in a single test sheet. The chart below puts rated capacity beside measured capacity for five consecutive years on the same truck.
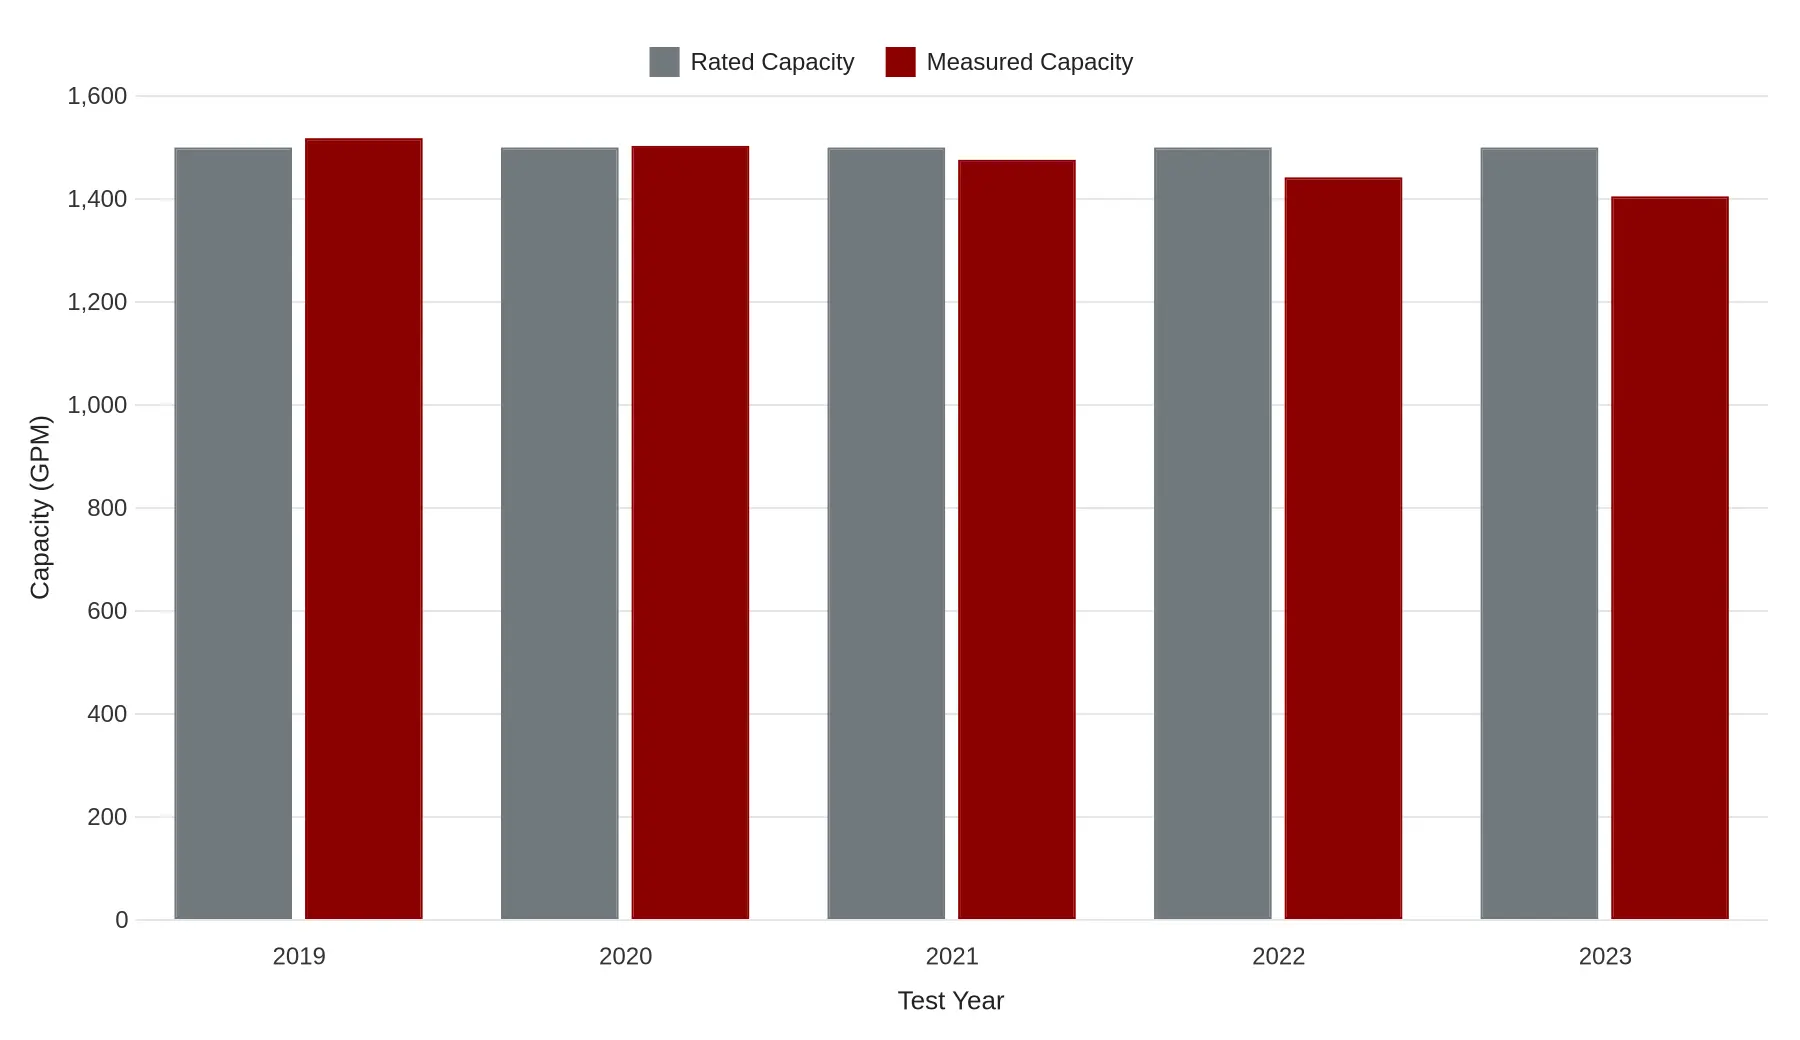
| Test Year | Rated Capacity (GPM) | Measured Capacity (GPM) | Variance (GPM) |
|---|---|---|---|
| 2019 | 1500 | 1518 | +18 |
| 2020 | 1500 | 1503 | +3 |
| 2021 | 1500 | 1476 | -24 |
| 2022 | 1500 | 1442 | -58 |
| 2023 | 1500 | 1405 | -95 |
The slope matters more than any single year. This pump lost about 7 percent of its 2019 measured capacity over four test intervals and now sits roughly 6 percent below its 1,500 GPM rating. The decline also steepened: the year-over-year drops were 15, 27, 34, and 37 GPM. That pattern usually points to wear in the impeller, clearances, or packing rather than a one-off gauge error. Before you make an offer, pull the pump, impeller, and drivetrain rebuild history and price the refurbishment into the offer.
Red Flags in Pump Test Documentation
A pump certificate can look official and still prove very little. When you review pump test records during used fire truck procurement, read them like an auditor. Every number should be traceable, dated, and tied to the apparatus in front of you. These problems should stop a deal:
- Missing or renumbered test years – annual service dates that skip a year or reappear with altered dates suggest the history was edited rather than maintained. That undermines any credible performance baseline.
- Mismatched pump serial numbers – a certificate for a different pump proves nothing about the truck you are buying.
- Capacity figures with no pressure or engine speed – a gallons-per-minute number alone, without discharge pressure and governed RPM, is marketing copy. Pumps are rated at defined points on a curve.
- Unsigned certificates or missing tester credentials – copies are normal. Copies with no signature, no tester name, and no calibration reference are not evidence of a witnessed test.
- No intake data – without suction readings, lift, and supply pressure, a strong discharge number may reflect a generous hydrant rather than a healthy pump.
- Foam proportioning left untested – a water test says nothing about injection rates or concentrate accuracy. On a foam apparatus, that omission is a functional failure, not a clerical one.
- Records from an entity you cannot verify – if you cannot contact the shop, confirm its certification, or find it in a licensing record, the certificate offers no assurance of method or calibration.
Negotiating on the Evidence You Actually Have
For pricing, undocumented pump performance counts as zero performance. If the seller cannot produce dated, signed, serial-matched results with pressure and engine speed, price the truck as if the pump must be pulled, rebuilt, or replaced, and negotiate from that number. Put documented deficiencies in the offer as deductions instead of moving them to a footnote. Verified paperwork supports a premium. A folder of unverifiable pages does not.
The Five-Step Record Check
The test sheet is the start of the paper trail, not the end of it. Work through the file in this order: request the documents, match serial numbers, study the trend, decide whether an independent retest is needed, then move to procurement sign-off. Each step narrows the risk you carry into the final commitment.
Diagram: the five-stage documentation check, from document request to procurement sign-off.
If the file survives this sequence, compare the verified truck against inspected fire fighting trucks currently available so the record and the machine can be judged together.
Remediation Cost and Negotiation
At the negotiating table, corrosion grades and pump test records become line items. Treat them that way, not as concerns to revisit after delivery.
Grade 3 or 4 body mount corrosion is structural. Before you submit an offer, have the seller or your own inspector price mount repair, subframe replacement, isolator renewal, and pump overhaul as separate written line items. A single “as-is” discount hides the real exposure. A pump that misses rated flow at its rated pressure, or shows collapsing vacuum on the priming test, belongs in the same list, not in a footnote.
The arithmetic is easy to miss before delivery. A $40,000 discount can go once in the shop and again in lost front-line availability while the rig sits out of service.
If the numbers do not close, compare specification levels before choosing repair over replacement. Weigh heavy-duty fire truck platforms against commercial fire trucks to see what the required capability costs new.
Municipal and government purchasing officers should put written remediation estimates and test-backed performance guarantees in the contract. An inspection that does not affect payment is advisory only. Tie final acceptance and payment to documented pump performance and verified mount integrity, and leave the risk with the seller until those conditions are met.
Practical Negotiation Checklist
| Finding | Negotiation Lever |
|---|---|
| Mount corrosion grade 3-4 | Exact repair or subframe replacement quote |
| Worn isolators | Line-item renewal cost |
| Pump below rated flow | Overhaul estimate plus performance guarantee |
| Missing test records | Price holdback until retest passes |
How Remediation Costs Usually Break Down
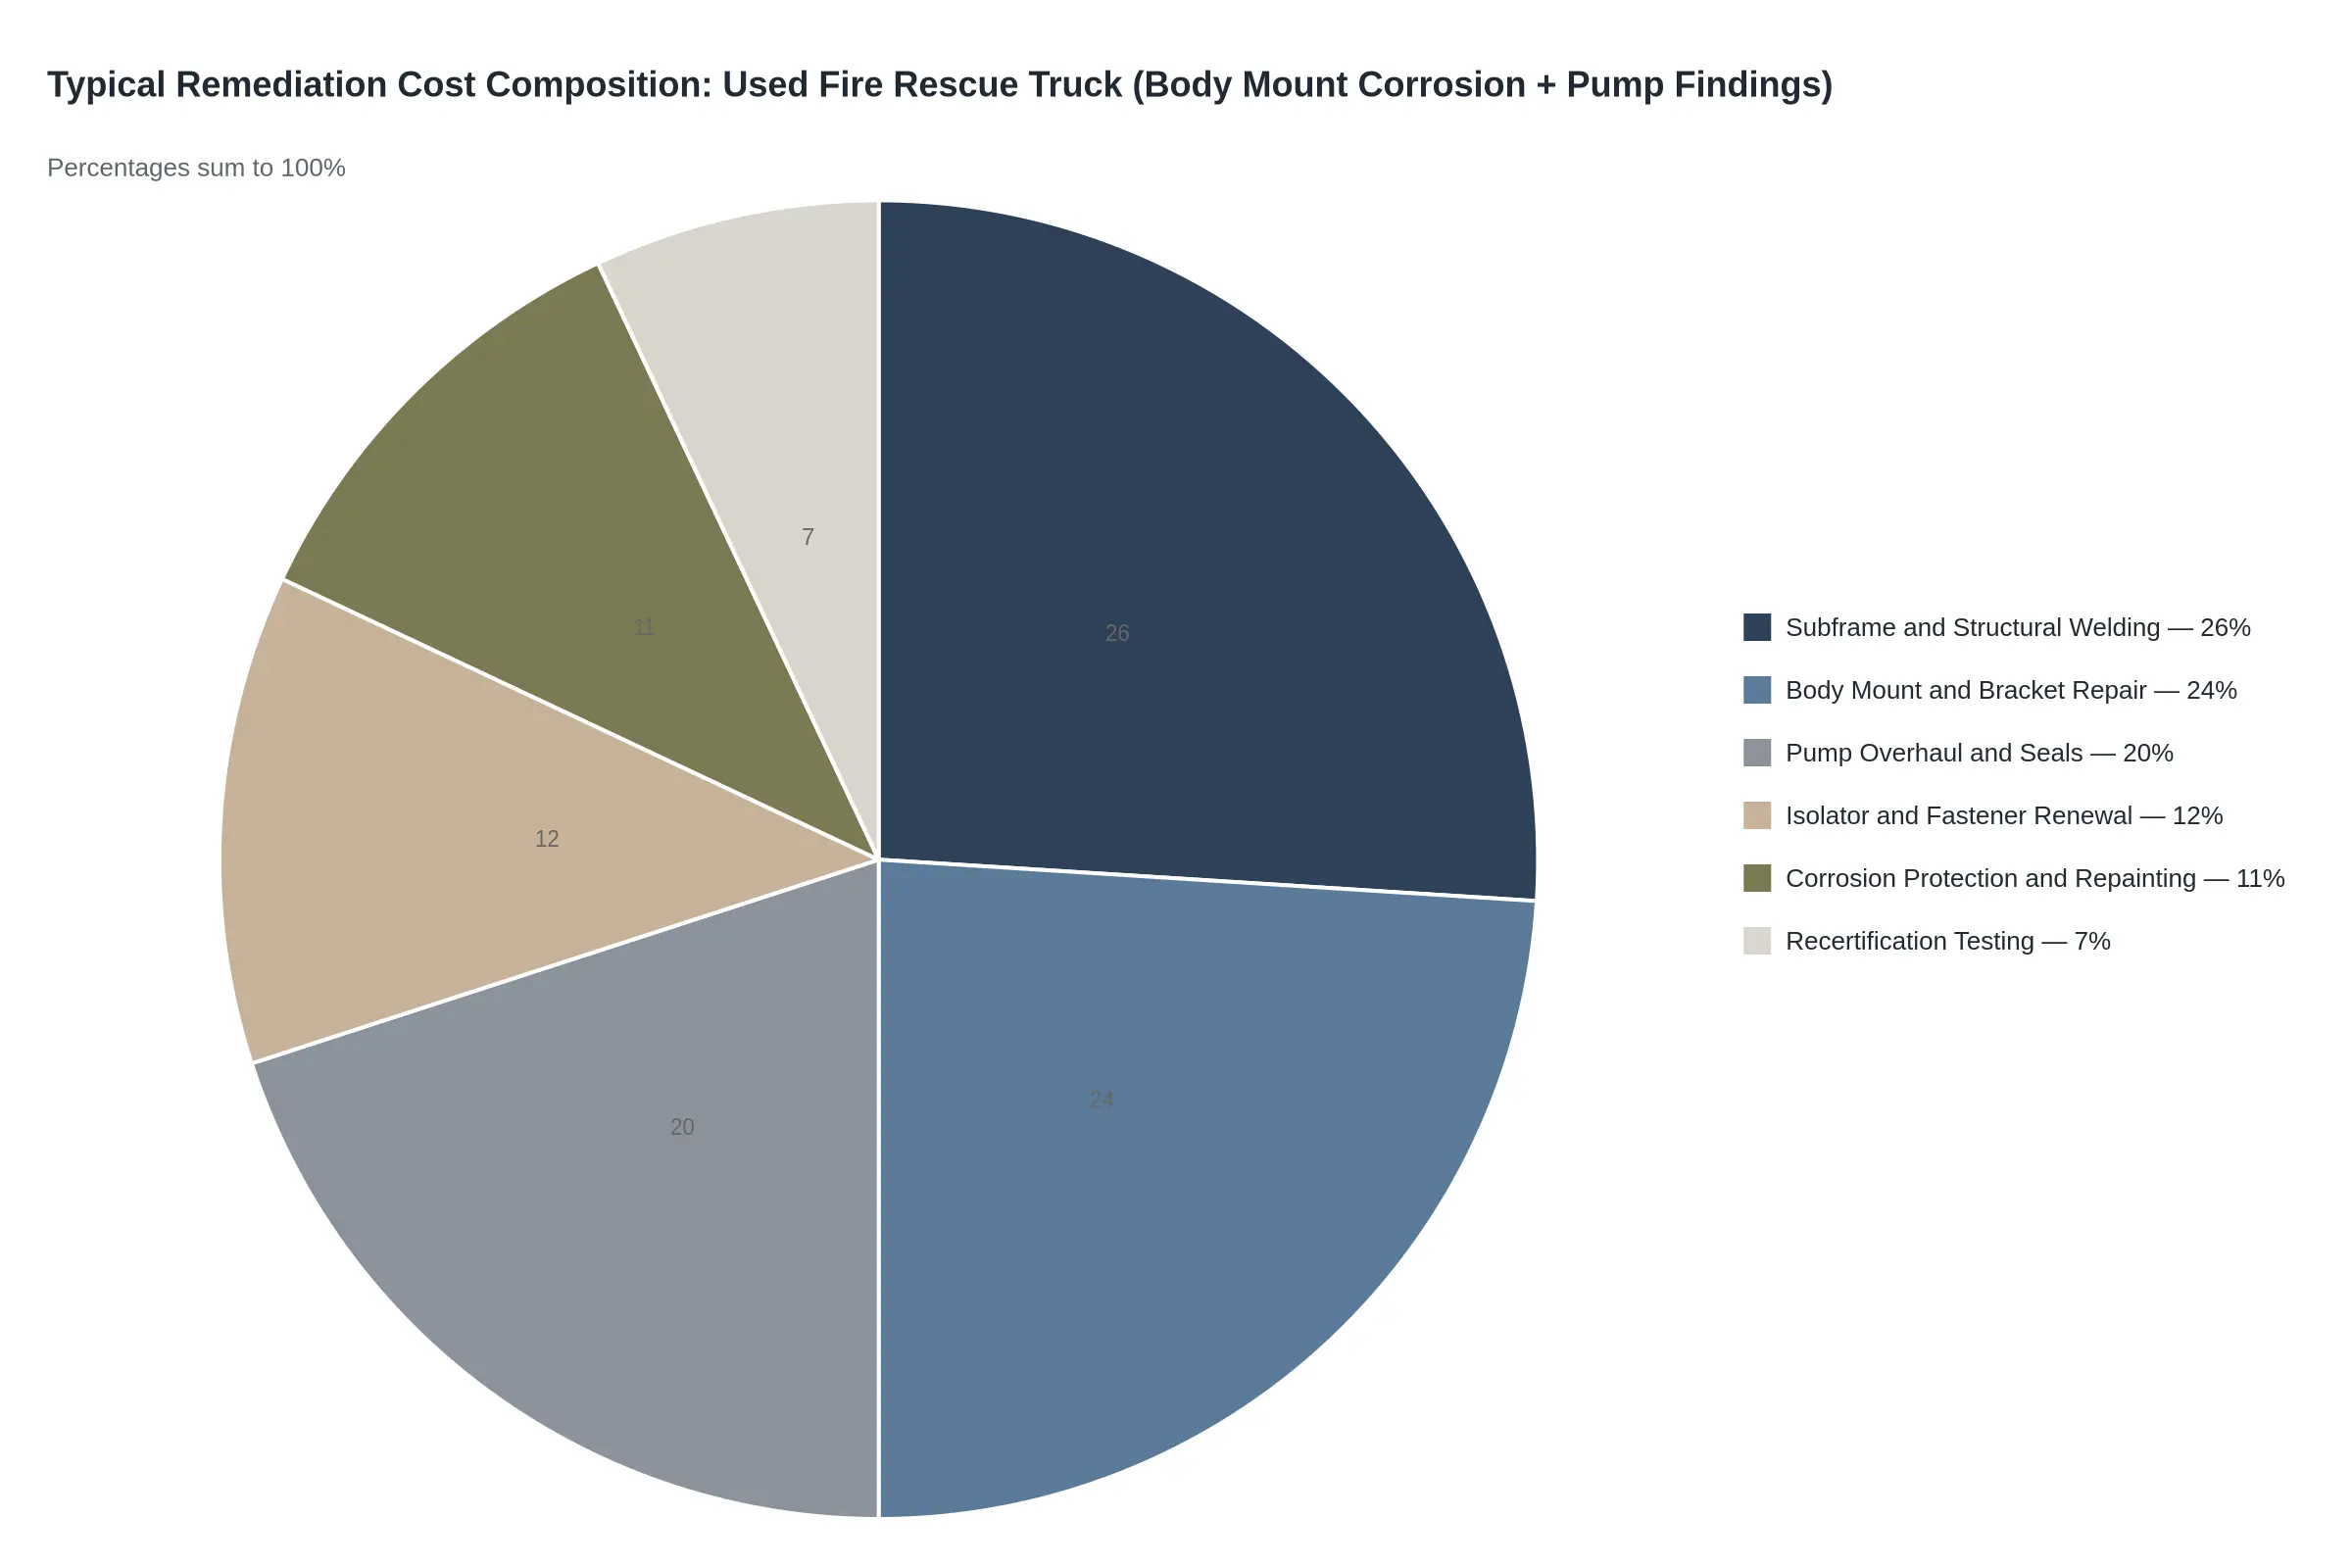
Once an inspection confirms body mount corrosion and pump deficiencies, the next question is what it will cost to make the truck service-ready. The chart below is a planning model for a used fire rescue truck with both problems, not a quote. Use it to start a budget, then replace the shares with your own line items as quotes come in.
Reading the Numbers
| Cost Segment | Share of Total | What It Covers |
|---|---|---|
| Subframe and structural welding | 26% | Cracked or thinned frame rails, outrigger tie-ins, welded gusset replacement, alignment verification |
| Body mount and bracket repair | 24% | Mount pucks, bracket fabrication, corrosion cut-out at mount pads, body lift and re-seating |
| Pump overhaul and seals | 20% | Pump teardown, impeller and wear ring evaluation, mechanical seals, packing, valve reseating |
| Isolator and fastener renewal | 12% | Rubber isolators, grade-8 hardware, anti-seize application, torque-to-spec documentation |
| Corrosion protection and repainting | 11% | Surface prep, cavity wax, undercoating, compartment repaint |
| Recertification testing | 7% | Pump performance test, body integrity verification, documentation package |
The Structural Argument in One Line
Add the two structural line items, 26% for subframe and structural welding and 24% for body mount and bracket repair, and half of the remediation budget is going into steel, welding, and the labor to reach it. Isolators and fasteners cost less than structural steel. Coatings and paint are mostly surface work. Pump overhaul is a large but discrete item that can often be quoted before closing.
That split matters in negotiation. A seller may point to a fresh pump seal kit as evidence of care, but seals do not fix a corroded mount pad. Once structural work is priced, the money left for the pump is visible. If the pump overhaul does not fit, the numbers make the walk-away decision for you.
How to Use This Model
- Scale the percentages to your quotes, not the other way around. If structural work comes in well above 50% of the total, the corrosion is probably worse than the inspection photos suggested.
- Watch for missing line items. A bid that leaves out recertification testing or cavity wax is not cheaper; it usually moves the cost into next year’s budget.
- Price the parts line separately. Isolators, fasteners, and pump components can sometimes take 10-20% out of the hardware portion when sourced from replacement fire truck parts suppliers.
- Treat structural work as a schedule risk. Welding and re-seating the body can keep the truck out of service for weeks, and that downtime has its own cost.
Percentages are a planning aid, not a substitute for a written estimate from an apparatus technician who has actually put a hammer and a borescope to the frame rails. Use the chart to frame the conversation with your shop, your finance office, and the seller. Then let the inspection report drive the final number.
Making the Buy or Walk Call
An inspection is useful only if it ends in a decision you can defend. Grade every body mount on the same five-point scale used above: G1 light surface oxidation, G2 isolated section loss, G3 continuous section loss, G4 perforation at the mount bracket, G5 deformation or cracked welds. If the worst mount is no worse than your written rejection threshold, the chassis clears the structural gate. If it is worse, stop. Do not haggle over a mount that has already lost section.
The documentation gate comes next. Confirm pump test records dated within the last twelve months, signed by a certified tester, and complete enough to trace: suction and discharge pressures, flow at 100 percent (150 psi), 70 percent (200 psi), and 50 percent (250 psi) on a pump rated at 150 psi, vacuum results, and a pump serial number that matches the build sheet or data plate. A missing annual, a blank flow column, or a serial mismatch is either a price adjustment or a disqualification. Decide which before you leave the lot.
Then put a dollar figure on remediation. Itemize blasting and recoating, mount replacement, hardware, pump service or rebuild, and downtime at your own standby rate. Add the line items and compare the total with the asking price plus inspection cost. A useful starting threshold is 15% of purchase price; above that, renegotiate or withdraw.
Bind the verdict into the sales contract. Require an independent retest by a third-party inspector the buyer selects, paid through escrow, with the truck delivered to that inspector before final payment. The clause should say plainly that a failed mount grade or incomplete pump documentation releases the deposit in full. With that condition signed, a truck that passed both gates is a purchase with a paper trail, not a hope.
Before releasing funds, match the verdict to the mission. A rescue primary, a water-supply primary, and a foam primary have different requirements. Compare industrial fire truck configurations, water tanker fire truck capacities, foam fire truck builds, and emergency rescue vehicle layouts side by side so the inspection result feeds into fleet planning.
Frequently Asked Questions: Body Mount Corrosion and Pump Test Records
Short answers to the questions that come up in a used-apparatus purchase. If the chassis survives this scrutiny, review our heavy-duty fire truck inventory.
How often should mount points be measured during a used fire rescue truck inspection?
Measure every body mount at each annual service interval and again immediately before purchase. Corrosion can advance faster than visual checks reveal, so put mount measurement on the calendar.
Does surface rust alone disqualify a used fire rescue truck?
No. Surface oxidation on the frame or brackets is cosmetic and does not disqualify a truck. Section loss, cracked welds, or dimensional movement do. Corrosion that has eaten into an anchor plate is a different finding from rust bloom on the surface.
What pump capacity shortfall is acceptable?
Zero shortfall at rated pressure. NFPA 1901 sets the pump performance criteria, and NFPA 1911 governs annual in-service testing. A pump that cannot deliver rated capacity at its rated pressure, typically 150 psi, needs repair before acceptance. A shortfall can come from impeller wear, internal leakage, or test conditions; find out which before you sign.
How many years of pump test records should exist?
Ask for the full service life. A five-year run gives you a usable trend, and the current year must be included. Older records say less about present condition. Missing years can mean undocumented service or an unrepaired failure.
Who should perform the independent verification?
Use a third-party inspector certified under the NFPA 1071 emergency vehicle technician standard and independent of both the seller and your department. The inspector should measure the mounts and review the pump records directly, not rely on the seller’s summary.
Can corrosion remediation be warranted?
It depends on the grade. G2 mounts and some G3 mounts can be repaired; G4 needs an engineered repair with sign-off; G5 is a walk-away. Welded reinforcement and cavity treatment can restore a mount, but the repair should be documented and measured again each year.
Conclusion: Both Gates, or No Purchase
Both gates have to open before money changes hands. The structural gate is body mount integrity, proven by measurements of bracket thickness, fastener torque, isolator condition, and corrosion penetration. The documentary gate is pump performance, proven by traceable records showing rated flow at rated pressure within the required interval. One gate does not excuse the other.
Measure the mounts, verify the pump file, and price remediation in the offer with a defined scope and a defensible cost. If the records are missing, incomplete, or show a shortfall, treat that as a stop, not a negotiating detail. The buyer carries that risk for as long as the truck stays in service, and a discount rarely covers it. For specification comparison across firefighting and rescue categories, CIMC Tianda’s fire fighting truck range is a useful reference.